A Pragmatic Pre-Flight Checklist for App Store Submissions
Last month I submitted a new version of one of my apps and it sailed through App Review without issues. Great, except I had forgotten to attach the new auto-renewable subscription product to the build in App Store Connect. The app went live with a hard paywall and no way for users to actually purchase anything behind it. Every screen that prompted a subscription just did nothing. I was losing sales for every hour the broken build was in production, and fixing it meant preparing another release, submitting it, and waiting for another full review cycle. The whole thing took days to resolve, all because of a single button I forgot to click before submitting.
If you have shipped more than a few iOS or Mac apps, you have a version of this story. Maybe you left TestFlight internal testing notes in your release description. Maybe you shipped a build with a staging API base URL still hardcoded behind a debug flag you forgot to flip. Maybe your App Review demo account credentials had expired and nobody noticed until the reviewer did. These are not complex engineering problems. They are process problems and they are embarrassing precisely because they are so avoidable.
After burning through enough of these mistakes, I sat down and wrote a strict pre-flight checklist that I now run before every single App Store submission. It covers the gaps that tend to slip through when you are rushing to ship, which is exactly when gaps slip through most easily.
The checklist
The checklist has three phases: what you do before you archive in Xcode, what you verify in App Store Connect, and the submission itself. I have kept it deliberately concise so it stays scannable under pressure.
Pre-Archive (Xcode)
| Step | Details |
|---|---|
| Bump version numbers | Set MARKETING_VERSION and CURRENT_PROJECT_VERSION in your build settings or .xcconfig. Verify they are correct in the General tab.
|
| Verify production endpoints | Confirm API base URLs, feature flags, and environment variables point to production, not staging or local. |
| Strip debug tools | Remove or gate any debug menus, test overlays, console logging frameworks, or developer-only UI behind compiler flags (#if DEBUG).
|
| Check Privacy Manifest | If you updated SDKs or added new frameworks, verify your PrivacyInfo.xcprivacy declares the correct API reasons and tracking domains.
|
| Run UI tests | Confirm your UI test suite passes on the target device class. Even a quick smoke test on the critical purchase and onboarding flows saves pain later. |
| Archive on Release config | Make sure you are archiving with the Release build configuration, not Debug. Check your scheme settings. |
App Store Connect
| Step | Details |
|---|---|
| Update release notes | Write the “What’s New” text for this version. Keep it factual and specific. |
| Update Privacy Nutrition Labels | If you added new SDKs, analytics, or data collection since the last submission, update the App Privacy section to match. |
| Verify review credentials | Confirm the demo account username and password in App Review Information actually work. Log in yourself and check. If the account requires 2FA, document the flow for the reviewer. |
| Attach IAPs and subscriptions | If this build introduces new In-App Purchases or auto-renewable subscriptions, make sure they are created, priced, and attached to this version. This is the one I forget most often. |
| Check screenshots and previews | Verify that screenshots are current and match what the reviewer will see. Outdated UI in screenshots can trigger a rejection. |
| Confirm age rating | If new content or features affect the age rating questionnaire, update it. |
Submission
| Step | Details |
|---|---|
| Select the processed build | Wait for the build to finish processing and then select it in the version page. Do not submit before processing completes. |
| Configure phased release | Decide whether to use phased release (gradual rollout over 7 days) or release immediately. For anything beyond a trivial patch, phased release gives you time to catch issues. |
| Review the submission summary | Read through everything one more time on the summary screen. This is your last chance to catch something before it goes to review. |
| Submit | Submit for review. |
That is the entire app store submission checklist. It takes about ten minutes to walk through if everything is already in order, which is a small price compared to losing a day or two to a rejection you could have caught.
The problem with static checklists
Here is where I should be honest about the flaw in what I just described. A checklist in a Notion doc or an Apple Note works perfectly well, right up until the moment you are scrambling to push a hotfix at 11 PM and you simply forget to open it. You skip straight to Xcode, archive, upload, submit, and then remember the checklist exists about four hours later when the rejection email arrives.
The checklist itself is not the problem. The problem is that nothing reminds you to use it at the exact moment you need it. It sits in a document somewhere, inert, waiting for you to remember it exists. And when you are in a rush, you will not remember, because that is how rushing works.
How I actually use this checklist
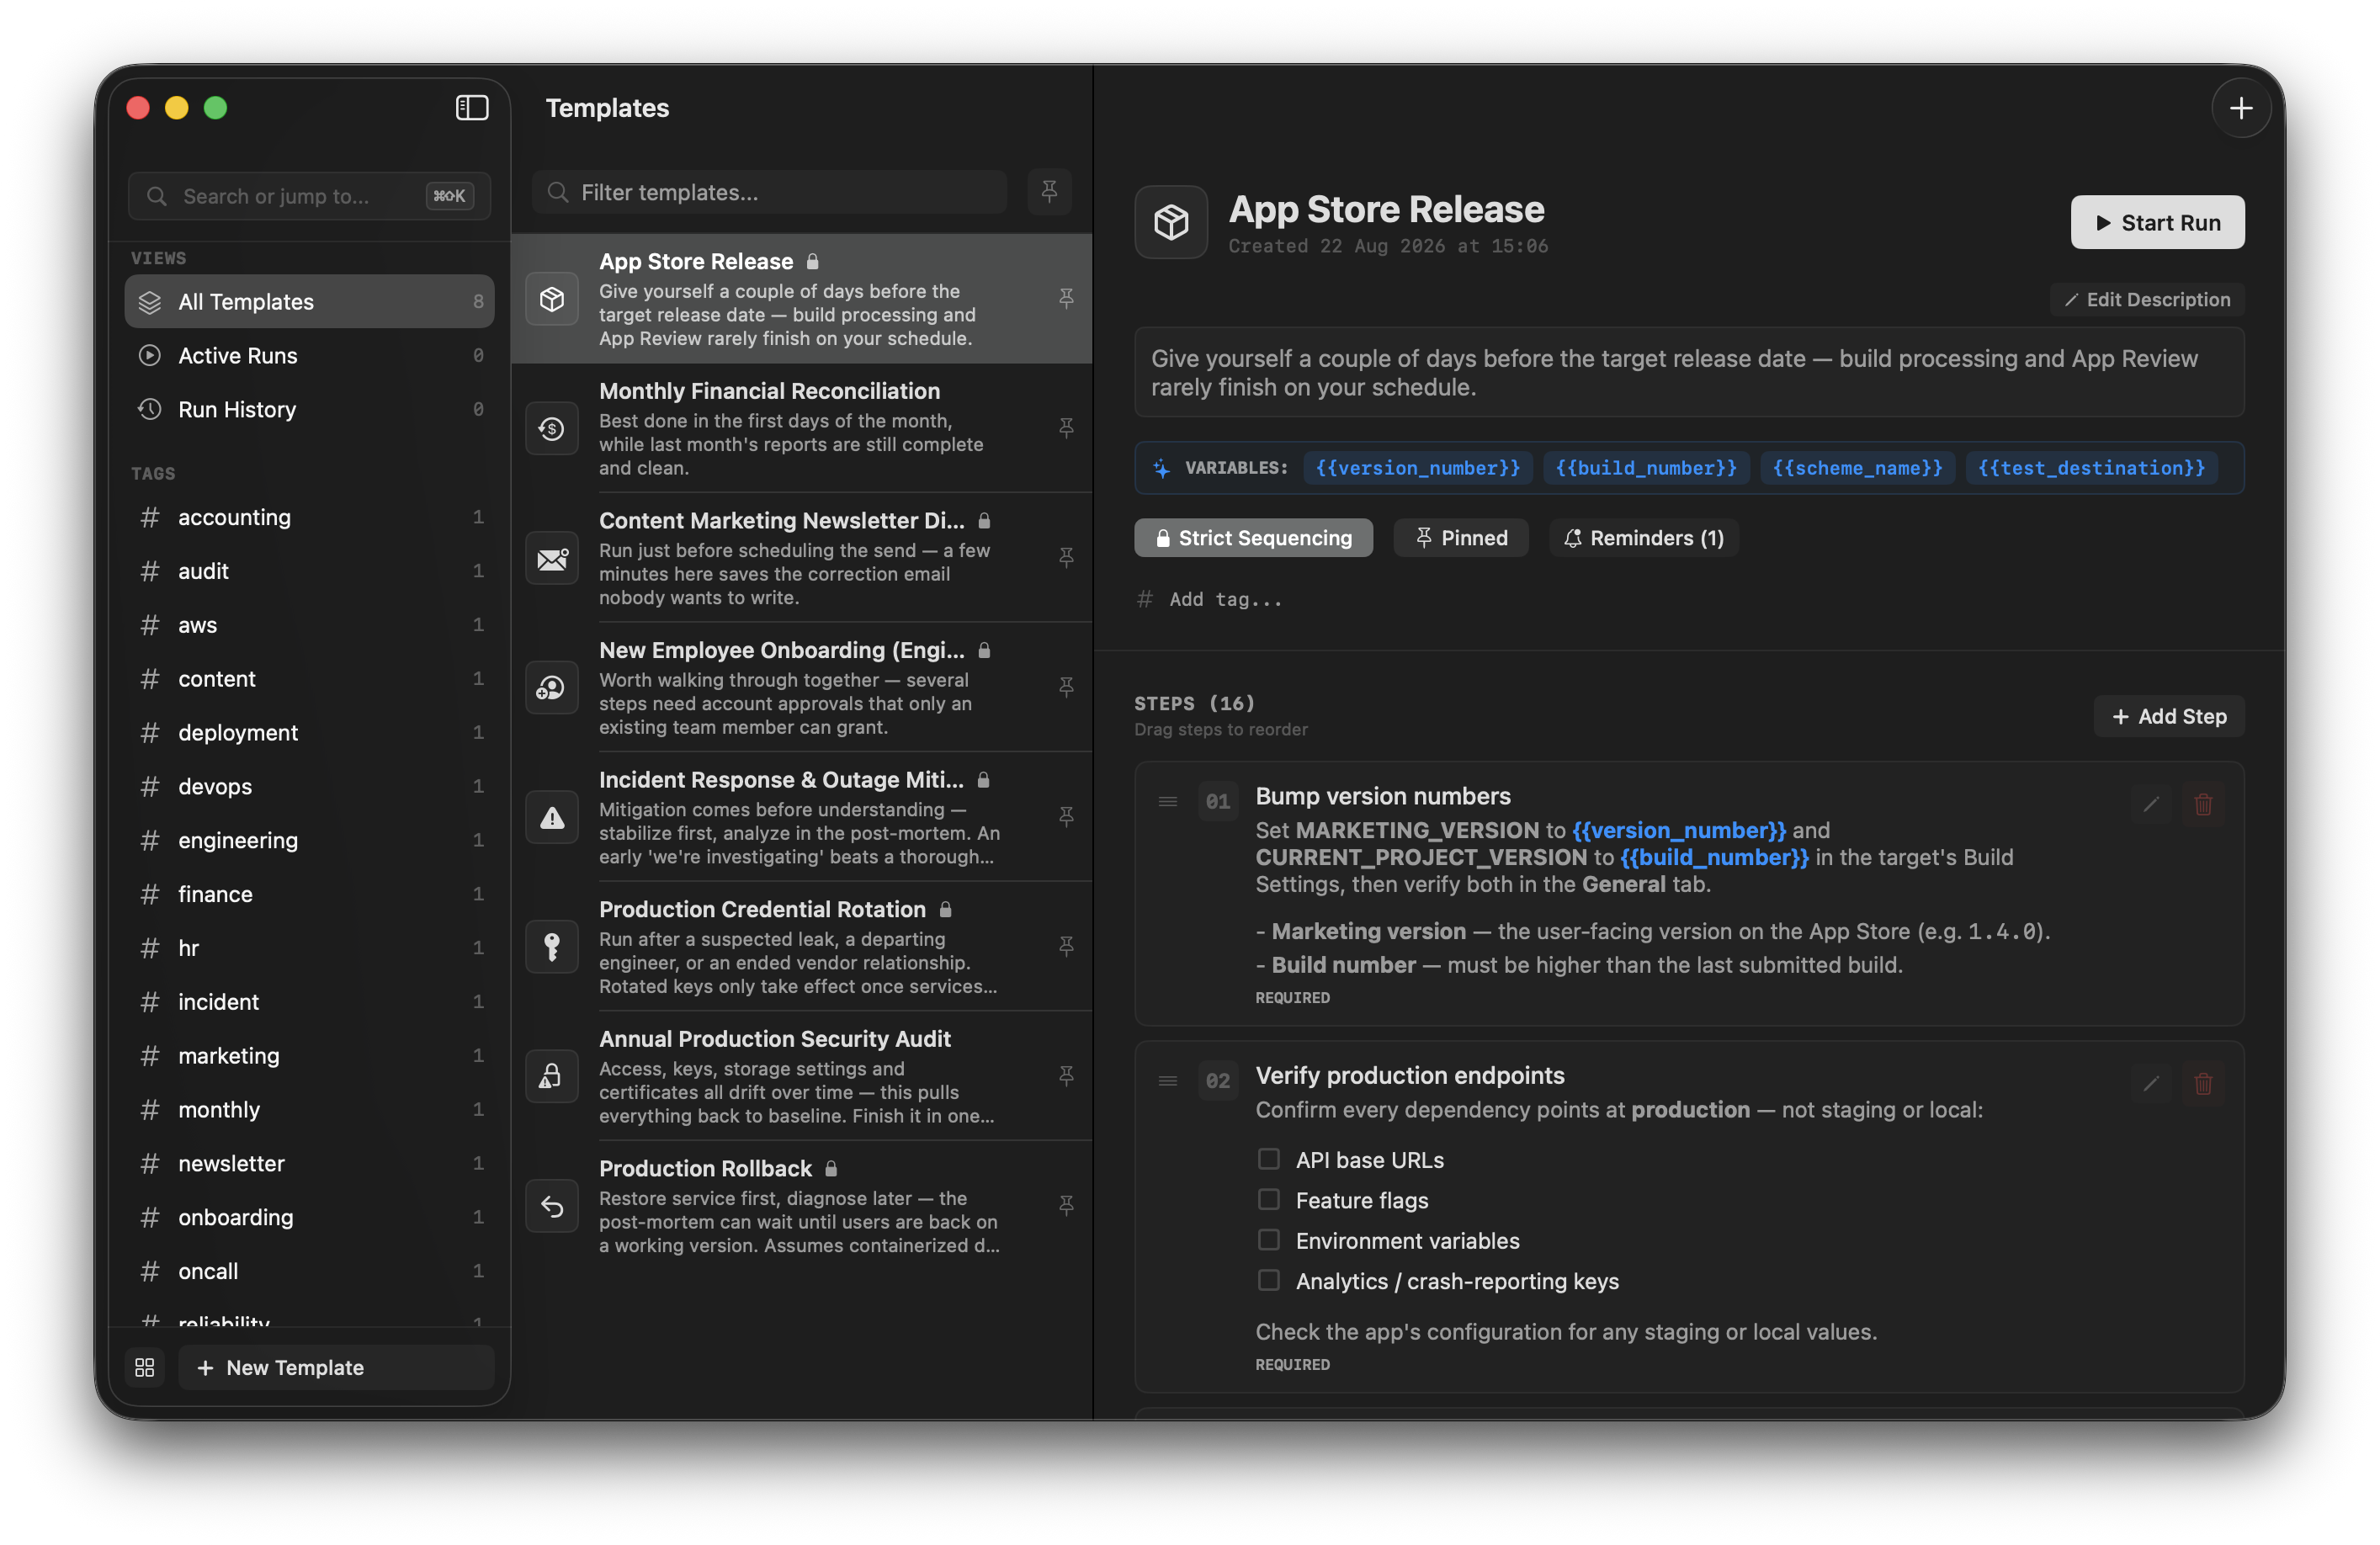
I built a Mac app called Airstrip to solve this specific workflow gap. The reason I built it was precisely because I kept running into this problem and nothing else solved it the way I needed.
Airstrip is a native Mac procedure manager. You create runbook templates with sequential steps, attach actions to each step (like “open this URL” or “copy this command to clipboard”), and then execute them as interactive runs. Each run is a deep copy of the template, so your execution history stays intact even if you update the template later. It is a structured way to follow the same iOS app release steps every time without relying on memory or discipline.
The feature that makes this actually useful for the App Store Connect runbook problem, though, is what Airstrip calls Context Observers. You can attach observer rules to any template that monitor which application or website domain you currently have in focus. So I have my App Store Release template configured with two observers: one watches for appstoreconnect.apple.com in my browser, and another watches for Xcode becoming the active application. The moment either of those conditions is met, Airstrip shows a quiet, non-intrusive banner at the top of the screen recommending I start the release checklist. I do not have to remember to open it. The checklist surfaces itself when the context is right.
Once I start the run, the procedure opens in Focus Mode, which is a compact borderless floating window that sits on top of whatever else I am working in. It stays visible alongside my browser or Xcode without taking over the screen. I work through each step, marking them done as I go. If a step has an attached URL action (like a link to the App Review Information page in App Store Connect), I can open it directly from the step. If a step has a command to copy, one click puts it on my clipboard.
When the run is finished, Airstrip keeps the completed execution in my history with timestamps for each step. If something goes wrong with a release later and I need to check whether I actually verified the demo credentials or confirmed the subscription was attached, the record is there.
The template
Rather than just describing the process, I have exported the exact Airstrip procedure template I use for my own releases as a downloadable .airp file.
The template includes all three phases from the checklist above — Pre-Archive, App Store Connect, and Submission — broken into individual steps with attached actions. Steps that involve opening a specific page in App Store Connect have URL actions pre-configured so you can jump straight there. Steps that involve running a terminal command have the command attached for one-click clipboard copy. There are variables like {{version_number}}, {{build_number}}, and {{scheme_name}} so you fill them in once at the start of each run and they propagate through every step that references them.
To use the template:
- Download the App Store Release template.
- Double-click the
.airpfile to import it into Airstrip. - Add a Context Observer for
appstoreconnect.apple.comso the template surfaces itself when you are in App Store Connect. - When it is time to submit, start a run, fill in your version and build numbers, and work through each step.
Get Airstrip for Mac
A native procedure manager for runbooks, release checklists, and operational workflows. Requires macOS 26 or later.