Taking an image of a part of the screen in a Cocoa app
Hi! In this post I will show you how to write a “screenshot taker” for a Cocoa app. It will allow the user to select a part of the screen, just like the builtin screenshot taking tool on macOS. It uses CGWindowListCreateImage (macOS 10.5 - 14.0), so it should work in old codebases although it’s important to note that it’s deprecated in macOS 14.0. In such case you should use ScreenCaptureKit and it’s functions like captureScreenshot. It should work well for most cases. Well, let’s start!
This code will be pretty lengthy so I will split it into two parts: a manager and a view controller. The manager will be the frontend for screenshot taking and the view controller will be responsible for selecting part of the screen. Let’s begin with the manager.
Manager
1 2 3 4 5 6 7 8 9 10 11 12 13 | class ScreenshotManager { private static var windowController: NSWindowController? = nil private static var isRunning = false static var completionHandler: (Result<NSImage, Error>) -> Void = { _ in } enum SMError: Error { case failedToTakeScreenshot case noSelection case alreadyInUse case noPermission case noAccessToScreen } } |
First we define the ScreenshotManager class in which we define the variables and the error type. windowController stores the window controller for selection window, isRunning contains information whether screenshot is already being taken and completionHandler contains a handler that will be called when the user stops selecting or an error happens while selecting. I will use static functions and variables because only one screenshot-taking can happen at a time. Now we will add a function for taking a screenshot from a part of the screen.
1 2 3 4 5 6 7 8 9 10 11 12 13 14 15 | class ScreenshotManager { ... @MainActor static func take(frame: NSRect) throws -> NSImage { isRunning = false let cgRect = CGRect(x: frame.origin.x, y: frame.origin.y, width: frame.width, height: frame.height) guard let screenshot = CGWindowListCreateImage(cgRect, .optionOnScreenOnly, .zero, []) else { throw SMError.failedToTakeScreenshot } return NSImage(cgImage: screenshot, size: .init(width: screenshot.width, height: screenshot.height)) } } |
This function receives a frame with the information about the selection’s size and position. Since CGWindowListCreateImage needs CGRect, we crate cgRect from the frame. .optionOnScreenOnly means that the image will contain only the visible windows and as the fourth parameter we provide an empty array since we don’t need any additional options. .zero is used a reference window ID, but I’m not sure what it means, but I works. Then, we convert the resulting image (screenshot) into an NSImage. Now we need to add the selecting part. We will begin by writing a function that will return the window controller responsible for selecting.
1 2 3 4 5 6 7 8 9 10 11 12 13 14 15 | class ScreenshotManager { ... static func returnWindowController() -> NSWindowController { let window = NSWindow(contentRect: .zero, styleMask: [.fullSizeContentView], backing: .buffered, defer: false) window.isOpaque = false window.backgroundColor = .clear window.titleVisibility = .hidden window.titlebarAppearsTransparent = true window.hasShadow = false return NSWindowController(window: window) } } |
This function configures the selection window. It makes it transparent using isOpaque and backgroundColor. It also removes all decorations (titlebar and shadow). Now let’s add the main function responsible for starting this process.
1 2 3 4 5 6 7 8 9 10 11 12 13 14 15 16 17 18 19 20 21 22 23 24 25 | class ScreenshotManager { ... @MainActor static func start(completionHandler: @escaping (Result<NSImage, Error>) -> Void) -> Error? { if self.isRunning { return SMError.alreadyInUse } guard let screen = NSScreen.main else { return SMError.noAccessToScreen } if !CGPreflightScreenCaptureAccess() { return SMError.noPermission } Self.completionHandler = completionHandler windowController = returnWindowController() windowController?.contentViewController = SelectionWindowViewController() windowController?.window?.setFrame(NSRect(x: 0, y: 0, width: screen.frame.size.width, height: screen.frame.size.height), display: false) windowController!.showWindow(nil) windowController?.window?.makeKeyAndOrderFront(nil) return nil } } |
This function accepts the completionHandler that will run once the selection ends and it also returns an error when there is selection already taking place, NSScreen.main is nil and if the app doesn’t have a screen capture permission (CGPreflightScreenCaptureAccess()). The function then configures and shows a window controller from the returnWindowController() function. The window will appear on the current space and overlay all windows. Now it’s time for the selection window.
Selection window
Let’s begin by defining the SelectionWindowViewController class inheriting from NSViewController, variables and it’s viewDidLoad() function.
1 2 3 4 5 6 7 8 9 10 11 12 13 14 | class SelectionWindowViewController: NSViewController { var selectionView: NSBox? = nil var centerPoint: CGPoint = .zero var overlay: NSView! = nil override func viewDidLoad() { super.viewDidLoad() overlay = NSView(frame: view.bounds) overlay.wantsLayer = true overlay.layer?.backgroundColor = NSColor.black.withAlphaComponent(0.5).cgColor view = overlay } |
The view controller defines three variables. selectionView which will contain the view that selects part of the screen, overlay view which darkens the screen and the centerPoint containing position of the mouse click. viewDidLoad() configures the overlay by making it transparent with a dark tint controlled by 0.5 parameter.
Note: Builtin screenshot app changes the cursor into crosshair. I tried adding it, but it looks like it loses focus and the cursor changes back. If you want to try to implement it, you will probably need to use a function like
self.view.addCursorRect(self.view.bounds, cursor: .crosshair)orNSCursor.crosshair.push().
To achieve the effect of transparent cutout within dark overlay we will need to use CALayer s which is implemented by setMask() function.
1 2 3 4 5 6 7 8 9 10 11 12 13 14 15 16 17 18 19 20 21 22 | class SelectionWindowViewController: NSViewController { ... func setMask() { guard let overlayLayer = view.layer else { return } let maskLayer = CALayer() maskLayer.frame = overlayLayer.bounds let path = CGMutablePath() path.addRect(overlayLayer.bounds) path.addRect(selectionView!.frame) let cutoutLayer = CAShapeLayer() cutoutLayer.frame = overlayLayer.bounds cutoutLayer.fillRule = .evenOdd cutoutLayer.fillColor = NSColor.black.cgColor cutoutLayer.path = path maskLayer.addSublayer(cutoutLayer) overlayLayer.mask = maskLayer } } |
This function will be called after every movement. It cuts out a part of the overlay. The most important part of this snippet is the .evenOdd fill rule. It is responsible for giving us the cut out effect. How des it work? Claude describes it like this:
1 2 3 | 1. Imagine drawing a line from any point in the plane to infinity. 2. Count the number of times this line crosses the path of your shape. 3. If the number of crossings is odd, the point is inside the shape and gets filled. If the number of crossings is even, the point is outside the shape and doesn't get filled. |
In the context of this function it works like this:
- The path includes two rectangles: one for the entire view bounds, and another for the selection view.
- For areas outside both rectangles, the line crosses 0 times (even) - not filled.
- For areas inside the outer rectangle but outside the inner rectangle, the line crosses 1 time (odd) - filled.
- For areas inside both rectangles, the line crosses 2 times (even) - not filled.
Now let’s implement selecting. First we begin with the function detecting first click:
1 2 3 4 5 6 7 8 9 10 11 12 13 14 15 16 17 18 19 20 21 | class SelectionWindowViewController: NSViewController { ... override func mouseDown(with event: NSEvent) { super.mouseDown(with: event) selectionView = NSBox() selectionView?.boxType = .custom selectionView?.cornerRadius = 0 selectionView?.fillColor = .lightGray selectionView?.title = "" self.view.addSubview(selectionView!) selectionView?.frame.origin = .init(x: event.locationInWindow.x, y: event.locationInWindow.y) centerPoint = selectionView!.frame.origin setMask() } } |
This function creates the selection view. setMask() uses it create the cutout. It’s configuration should be self-explanatory. We also set its origin to the position of the mouse, which is stored in event.locationInWindow, and run setMask() to create the cutout. Now it’s time to handle mouse movement.
1 2 3 4 5 6 7 8 9 10 11 12 13 14 15 16 17 18 19 20 21 22 23 24 25 | class SelectionWindowViewController: NSViewController { ... override func mouseDragged(with event: NSEvent) { super.mouseDragged(with: event) guard let selectionView else { return } let width = abs(centerPoint.x - event.locationInWindow.x) let height = abs(centerPoint.y - event.locationInWindow.y) selectionView.frame.size = .init(width: width, height: height) if event.locationInWindow.x < centerPoint.x && event.locationInWindow.y < centerPoint.y { selectionView.frame.origin = .init(x: event.locationInWindow.x, y: event.locationInWindow.y) } else if event.locationInWindow.x < centerPoint.x { selectionView.frame.origin = .init(x: event.locationInWindow.x, y: centerPoint.y) } else if event.locationInWindow.y < centerPoint.y { selectionView.frame.origin = .init(x: centerPoint.x, y: event.locationInWindow.y) } else { selectionView.frame.origin = .init(x: centerPoint.x, y: centerPoint.y) } setMask() } } |
Here we need a little bit more work. We first check if the selection view exists, then we calculate and assign the new width and height by taking absolute values of appropriate subtractions. Now we have 4 cases for each possible change of cursor’s position relative to the center point (first mouse click). This is because the origin of the selection view has to always be in the bottom-left corner, so if we move cursor down or left relative to the center point we will need to update selection view’s origin coordinates.
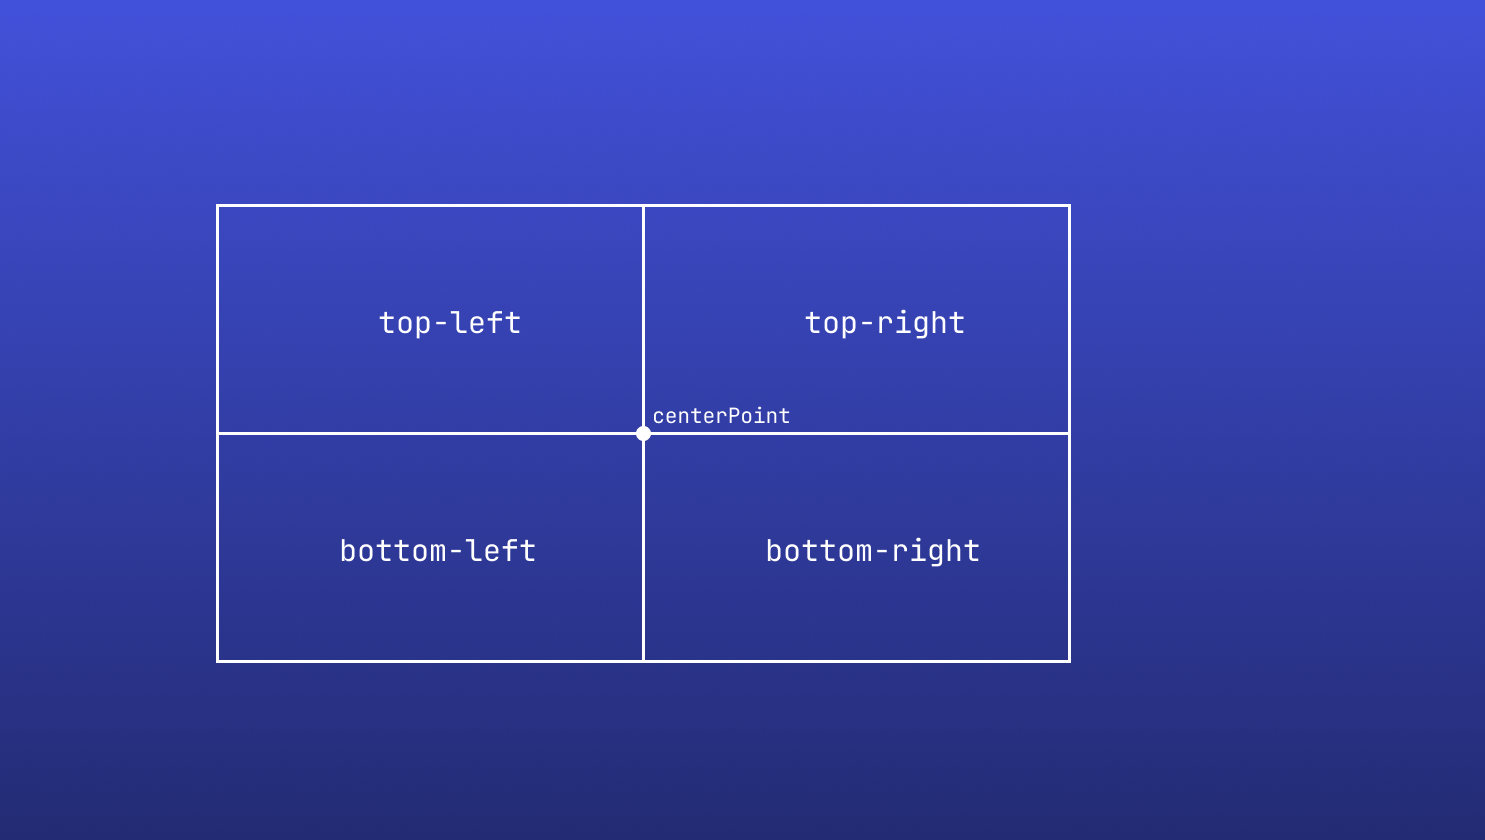
- Cursor is in the bottom-left part - origin point equal to the cursor position.
- Cursor is in the top-left part - origin point’s x equal to cursor’s x and origin point’s y equal to center point’s y.
- Cursor is in the bottom-right part - origin point’s x equal to center point’s x and origin point’s y equal to cursor’s y.
- Cursor is in the top-right part - origin point equal to the center point.
Now it’s time for the final part - the user finished selecting (mouse up).
1 2 3 4 5 6 7 8 9 10 11 12 13 14 15 16 17 18 19 20 21 22 23 24 25 26 27 28 29 30 31 32 33 | class SelectionWindowViewController: NSViewController { ... override func mouseUp(with event: NSEvent) { super.mouseDown(with: event) guard let selectionView else { return } self.window?.close() var frame = selectionView.frame frame.origin.y = NSScreen.main!.frame.maxY - frame.size.height - frame.origin.y do { let image = try ScreenshotManager.take(frame: frame) NSSound.beep() ScreenshotManager.completionHandler(.success(image)) ScreenshotManager.completionHandler = { _ in } } catch { ScreenshotManager.completionHandler(.failure(error)) ScreenshotManager.completionHandler = { _ in } } } var window: NSWindow? { for window in NSApp.windows { if window.contentViewController == self { return window } } return nil } } |
First we close the window. Now we need to calculate the frame of the selection. Unfortunately, origin’s y in the window (same size as the screen) doesn’t correspond to the screen’s actual position. That’s because screen’s coordinates are flipped horizontally - y = 0 is on the screen’s top-left corner while in a window it’s the bottom-left corner. I simply calculate it by subtracting selection’s height and origin from screen’s height. There are builtin functions to convert between these two coordinate systems but I tried and none of them worked. If you can make them work, then using them would probably be a better practice, but this calculation should be enough. Now we call the ScreenManager.take() function which takes the image of the part of the screen described by the converted selection’s frame. For good measure we make a beep. Then we call the currently set completion handler with the image and reset it. In case of an error, we call the completion handler with the error and reset it. I’m also adding a window variable so that we can access the window from it. It’s not the most efficient way, but it’s enough for this use case.
Well, that’s it. That will allow you to take a screenshot of part of the screen.
1 2 3 4 5 6 7 8 9 10 11 12 13 14 15 16 17 18 19 20 21 22 23 24 25 26 27 28 29 30 31 32 33 34 35 36 37 38 39 40 41 42 43 44 45 46 47 48 49 50 51 52 53 54 55 56 57 58 59 60 61 62 63 64 65 66 67 68 69 70 71 72 73 74 75 76 77 78 79 80 81 82 83 84 85 86 87 88 89 90 91 92 93 94 95 96 97 98 99 100 101 102 103 104 105 106 107 108 109 110 111 112 113 114 115 116 117 118 119 120 121 122 123 124 125 126 127 128 129 130 131 132 133 134 135 136 137 138 139 140 141 142 143 144 145 146 147 148 149 150 151 152 153 154 155 156 157 158 159 160 161 162 163 164 165 166 167 168 169 170 171 172 173 174 175 176 177 178 179 | import Cocoa class ScreenshotManager { private static var windowController: NSWindowController? = nil private static var isRunning = false static var completionHandler: (Result<NSImage, Error>) -> Void = { _ in } enum SMError: Error, LocalizedError { case failedToTakeScreenshot case noSelection case alreadyInUse case noPermission case noAccessToScreen } @MainActor static func take(frame: NSRect) throws -> NSImage { isRunning = false let cgRect = CGRect( x: frame.origin.x, y: frame.origin.y, width: frame.width, height: frame.height) guard let screenshot = CGWindowListCreateImage(cgRect, .optionOnScreenOnly, .zero, []) else { throw SMError.failedToTakeScreenshot } return NSImage( cgImage: screenshot, size: .init(width: screenshot.width, height: screenshot.height)) } static func returnWindowController() -> NSWindowController { let window = NSWindow( contentRect: .zero, styleMask: [.fullSizeContentView], backing: .buffered, defer: false) window.isOpaque = false window.backgroundColor = .clear window.titleVisibility = .hidden window.titlebarAppearsTransparent = true window.hasShadow = false return NSWindowController(window: window) } @MainActor static func start(completionHandler: @escaping (Result<NSImage, Error>) -> Void) -> Error? { guard let screen = NSScreen.main else { return SMError.noAccessToScreen } if !CGPreflightScreenCaptureAccess() { return SMError.noPermission } if self.isRunning { return SMError.alreadyInUse } Self.completionHandler = completionHandler windowController = returnWindowController() windowController?.contentViewController = SelectionWindowViewController() windowController?.window?.setFrame( NSRect(x: 0, y: 0, width: screen.frame.size.width, height: screen.frame.size.height), display: false) windowController!.showWindow(nil) windowController?.window?.makeKeyAndOrderFront(nil) return nil } } class SelectionWindowViewController: NSViewController { var selectionView: NSBox? = nil var centerPoint: CGPoint = .zero var overlay: NSView! = nil override func viewDidLoad() { super.viewDidLoad() overlay = NSView(frame: view.bounds) overlay.wantsLayer = true overlay.layer?.backgroundColor = NSColor.black.withAlphaComponent(0.5).cgColor view = overlay self.view.addCursorRect(self.view.bounds, cursor: .crosshair) NSCursor.crosshair.push() } override func mouseDown(with event: NSEvent) { super.mouseDown(with: event) selectionView = NSBox() selectionView?.boxType = .custom selectionView?.cornerRadius = 0 selectionView?.fillColor = .lightGray selectionView?.title = "" self.view.addSubview(selectionView!) selectionView?.frame.origin = .init(x: event.locationInWindow.x, y: event.locationInWindow.y) centerPoint = selectionView!.frame.origin setMask() } override func mouseDragged(with event: NSEvent) { super.mouseDragged(with: event) guard let selectionView else { return } let width = abs(centerPoint.x - event.locationInWindow.x) let height = abs(centerPoint.y - event.locationInWindow.y) selectionView.frame.size = .init(width: width, height: height) if event.locationInWindow.x < centerPoint.x && event.locationInWindow.y < centerPoint.y { selectionView.frame.origin = .init(x: event.locationInWindow.x, y: event.locationInWindow.y) } else if event.locationInWindow.x < centerPoint.x { selectionView.frame.origin = .init(x: event.locationInWindow.x, y: centerPoint.y) } else if event.locationInWindow.y < centerPoint.y { selectionView.frame.origin = .init(x: centerPoint.x, y: event.locationInWindow.y) } else { selectionView.frame.origin = .init(x: centerPoint.x, y: centerPoint.y) } setMask() } override func mouseUp(with event: NSEvent) { super.mouseDown(with: event) guard let selectionView else { return } self.window?.close() var frame = selectionView.frame frame.origin.y = NSScreen.main!.frame.maxY - frame.size.height - frame.origin.y do { let image = try ScreenshotManager.take(frame: frame) NSSound.beep() ScreenshotManager.completionHandler(.success(image)) ScreenshotManager.completionHandler = { _ in } } catch { ScreenshotManager.completionHandler(.failure(error)) ScreenshotManager.completionHandler = { _ in } } } func setMask() { guard let overlayLayer = view.layer else { return } let maskLayer = CALayer() maskLayer.frame = overlayLayer.bounds let path = CGMutablePath() path.addRect(overlayLayer.bounds) path.addRect(selectionView!.frame) let cutoutLayer = CAShapeLayer() cutoutLayer.frame = overlayLayer.bounds cutoutLayer.fillRule = .evenOdd cutoutLayer.fillColor = NSColor.black.cgColor cutoutLayer.path = path maskLayer.addSublayer(cutoutLayer) overlayLayer.mask = maskLayer } } extension NSViewController { var window: NSWindow? { for window in NSApp.windows { if window.contentViewController == self { return window } } return nil } } |